Misc

27 November 2011

Fuel injector swap and AEM Fuel Rail Installation

I was running 280cc injectors off the Honda Prelude which are peak and hold (Low impedence) injectors.  Not required for my applications and I decided to swap them out to the DC2R injectors which are saturated (High impedence) injectors. First I had to remove the resistor box which has be used with the low impedence injectors so as to prevent the ECU from being fried (Low Impedence = Higher Current).

The resistor box are pointed out by the white arrow. Do note that the car does not comes with the resistor box installed originally.


In my case, I just need to join the red wire to the yellow/black wires.


Since I was working on the plugs, I decided to move them away from the original position to hide them away until I start my wire tuck project ;p


Left:  OBD1 Injector plug  Right:  OBD2 Injector plug

Next I had to swap out the the plugs, since the injectors are OBD2. 


Some heat shrink and high heat resistance conduit.


Just remember to match the yellow/black wires accordingly as on the plugs to the harness.


Next to remove the fuel rail.


Do remember to release the pressure in the fuel system by opening the fuel tank cap and pressure release bolt on the fuel filter.

Use a 19mm wrench and loosen the banjo/fuel damper. And remove the fuel regulator or in my case; a adapter. There are just 3 bolts holding the fuel rail in place.


Replace the rubbers seals/o-ring on the injectors.


The AEM fuel rail (Part no. 25-103BK) comes with everything that I needed to install it. Do change the injector seals instead of using back the old ones to prevent leaks.  The only problem I had was the AN6 nut on the right side, it was leaking quite badly although I installed the crush washer that came with it (The washer didnt fit very well, it was too big).  I had to use teflon tape to wrap around the nut to stop the leak.


Install the fuel regulator or adapter back


The banjo with the damper.


Check all bolts are tightened. Switch to ignition a few times to prime the fuel, check for leaks before starting engine.  Once engine started, check for leaks again and you are done.

24 November 2011

Useful links and good reads

I have added some links on the right bar.  Some provide good reads and others provide some good DIY info.

21 November 2011

-AN fittings

I got my AEM fuel rail for awhile and never got to install it as I was planning to change the fuel lines to braided hoses and -AN fittings for looks. 

When I finally decided to go ahead with the project, I tried to search for the size of the fitting I will need.  During my search, I stumbled upon a article by Precision Engine on AN fittings which I found to be one of the most comprehensive available.  An article in Honda Tuning May 2008 issue alsoexplained quite extensively on AN fittings.

Do read up if u intent to upgrade your fuel hose and fittings for more bling factor :)

Anyway, just a quick write-up until I come up with a post on fuel line and fittings "upgrade" for the EG.  The AN (Army/Navy) sizes originated from the Aerospace industry years ago and were designated as the Outer Diameter of the rigid metal tube that each size fitting is used with. For hoses it will be the measurement of the Inner Diameter, where it is measure in denominations of 1/16″ of an inch. For example, a -10 size translates to 10/16″, or 5/8″ inside diameter and -6 means that the inside diameter is 6/16″ (or 3/8″). A -8 size is 8/16″ (or 1/2″) inside diameter. Just remember that the format is based on 1/16″.

Important note: The AN fitting features a 37 degrees flare while home plumbing are using 45 degrees flare. THIS MEANS they do not fit each other!

Standard thread size for AN fittings  (not to be confuse with hose size).
AN2 5/6"-24
AN3 3/8"-24
AN4 7/16"-20
AN5 1/2"-20
AN6 9/16"-18
AN8 3/4"-16

For AEM fuel rails, the end fittings are AN6 or 9/16"-18 (9/16" is the 'bore' size -18 is the thread per inch (TPI)).

Basically, when all the hoses and fittings are in -AN sizes, it is really easy to match the fittings to the hoses. A -6 hose will match a -6 fitting.  The problem arises when u need to get the right adapter for match the NPT, METRIC, BSPT size.  For the EG, most parts are in Metric size.  For example the stock fuel rail is apparently M12x1.5 (Yet to be confirmed), so u will need to get a M12 x 1.5 to AN -6 adapter.

BTW AN fittings aint cheap, so do make you get the right size before ordering.  Replacing the fuel line from my two external fuel pump to the fuel rail will cost me in the excess of US$100 excluding shipping cost.

13 November 2011

PLX SM-AFR GEN2 and GEN1 comparision

Left: Gen 1 Right: Gen 2
Well u can see the plugs are different. Notice the wires on GEN 2 are quite puny compared to GEN1? And Gen 2 wires arent wrap with conduit.
To reduce the stress that may be exerted on the "puny" wires and to protect the wires. I added a conduit and tape it to the plugs directly.


The O2 sensor looks the same, less the marking on the sensors itself.

12 November 2011

PLX SM-AFR GEN2 with DM-6

A little nice surprise today.


Although the SM-AFR GEN2 module looks the same as GEN1, the GEN2 has a new single circuit board while the Gen 1 has 2 circuit board. Apparently PLX managed to squeeze everything onto a single circuit board. 

The O2 Sensor plugs are different from GEN1.

Take note: Unlike GEN1 set, the GEN2 does not comes with O2 bung and plug, so take note to order one if u intend to install the wide-band sensor while keeping the stock O2 sensor at the same time.


Low Profile Hydraulic Floor Jack

Finally got a proper floor jack. The smaller 2 ton jack is what I was using before which can't jack the car high enough to fit in the floor stand.

06 November 2011

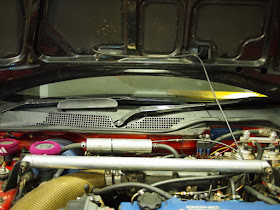
Front wiper and cowl respray

Before
After


After sanding

Primer and Matt Black


Removing the wipers and cowl


04 November 2011

Rear wiper renewal pictorial


 Sand (180grit) -> Primer Spray -> Matt Black Spray -> done!
Before

After